shooting in black and white

A couple of weeks ago I went back East to attend Webb & Liz’s wedding in Greenfield, Mass.  Webb and I have been friends forever, and I wanted to have some images from the event that I was happy with.  I decided to bring along my SLR instead of just my G10 so that I could have more control over the images.

After deciding on the SLR, the next decision was what lens to bring.   While I wanted the SLR, I didn’t like the prospect of having a big honking lens (or worse: multiple lenses!).  After all, I wanted to enjoy the event as well, I didn’t just want to photograph it.  So I brought along the 20mm f/2.8 lens.  This would allow me to reduce the overall bulk of the camera as well as better capture low-light situations.

Next, I opted not to bring an external flash, instead relying on the built-in flash of my D300.  I don’t often use this flash, but it is a great option for when you want it.  In this case, I only used the flash on the night-before events which took place in a really dark bowling alley.

I decided before-hand that I wanted to have black & white images for this event, so I set up my camera to “shoot” in black and white.  Actually, I shoot in RAW mode, meaning that all of the image capture is stored in an unprocessed state, allowing all sorts of fine tuning during ‘processing.’  So what I did was set my camera to black and white shooting mode, so that the rear panel would show the image to me in black and white, even though it was really a full-color image that I was storing.  This gave me the best of both worlds.  By doing so I was able to preview what the image would look like in black and white, while still capturing the raw data, to allow me to do as I please when I generate the image.

Once back at my laptop, I transferred the raw files to Lightroom and applied some basic settings to process the raw files into black and white images.  I have several presets that I have downloaded from across the web that apply different kinds of settings – and in this case, I used some basic ‘film emulators’ settings to re-create the typical settings for a film like Tri-x, a film I’m used to shooting with.  With these settings in place, I then made common adjustments (lights, darks, contrast, etc.,).

Overall, I’m pretty happy with the outcome.  I think the images look decent on screen (especially considering the varying lighting conditions – from a neutral walk around town to a dark bowling alley (with flash) to a challenging-ly lit reception area to an overly-bright outdoor scene).   I was also trying to achieve multiple looks in the images – like blurring the dancing scenes to convey the sense of motion.  Some of these turned out OK but this is an effect that I wasn’t thrilled with this time…

There’s so much possible with digital processing – it’s a lot to get one’s hands around, but I definitely feel like I’m improving over these past few years.
Finding the time to be productive

I’ve had the opportunity a few times where I’ve taken time off between jobs.  I am a HUGE fan of this and I can’t speak highly enough about it.  One of the things that amazed me, though, was people who would ask:

“What do you do with your time?”

These people would admit that were it them, they’d go stir crazy.

This is not something that I’ve suffered.  I find that there are so many things calling for my attention.  In fact, while gainfully employed I often find it hard to make the time to pursue the many activities that I enjoy.

I’ve been making an effort recently to spend more time working on some photo projects, including my weekly photo postings.  The main purpose of this effort is to make sure I’m spending more time examining the photos I’m taking (I’ve taken) in order to improve future images.  I figured, I should be able to spend at least a little time each week on this.  It’s just 1 photo per week, after all.

And yet, I’m amazed at how difficult it’s been.  And so it’s with some amazement that I look at others and dustin-was-herewhat they’re able to get done.  Recently, I’ve been checking in on a photo blog where the author, Dustin Diaz, produces 1 photograph to post PER DAY.  And these are highly-stylized, photos with lighting setups and accompanying tech notes and everything.  I am just amazed that he is able to find the time each and every day to put towards this effort (this in addition to holding down a job, relationship and even pet ownership, from what I can gather).

I’ll admit that some of the photos end up being quite similar and you might fault him for that but remember: each of those photos is going to take a couple of hours (including planning, set up, shooting, tear down, post processing, posting, describing, and then dealing with the comments, etc.,) so one can’t fault him too much for falling back to a similar setup.  Besides, it’s not like there’s a lot of time left in the day for pre-planning these thing and coming up with more differentiated setups.

Over the coming months, where I spend my time is going to be something I’m more consciously thinking about.  I feel like I’m already pretty decent at minimizing time spent on less-important stuff, it’s just that I’ve got to re-draw the line, lopping more stuff into the less-important column.

Canon introduces G11

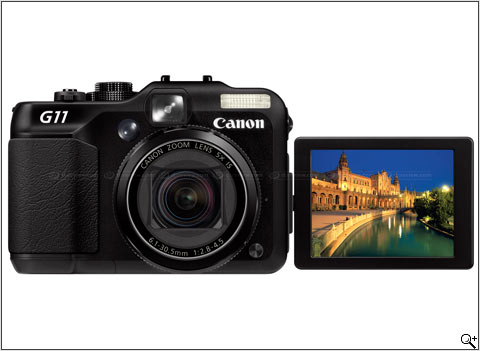
Today Canon introduced the Powershot G11 – the successor to the G10 (which I own and like very much).

PowerShot-G11-FRT-LCD_001
image courtesy DP Review

I have been a big fan of the Canon G- series of cameras and the G11 looks to be an awesome addition to the lineup.  In a bit of a surprise, they’ve reduced the megapixel count from 14.4MP in the G10 to 10MP in this new G11.  This is an excellent decision – realizing that 10MP is more than enough to suit the needs of what most people are using the camera for.  In place of all of those megapixels, they’ve improved the overall image sensor’s sensitivity, allowing for better images in more difficult lighting situations.  From the press release:

Canon’s new Dual Anti-Noise System combines a high sensitivity 10.0 Megapixel image sensor with Canon’s enhanced DIGIC 4 image processing technology to increase image quality and greatly improve noise performance by up to 2 stops (compared to PowerShot G10). The PowerShot G11 also includes i-Contrast technology, which prevents high-light blowout whilst retaining low-light detail – ideal for difficult lighting situations.

The G11 is equipped to deal with any light condition.  Low Light mode enables photographers to shoot up to ISO 12,800 in reduced 2.5MP resolution, whilst a built-in Neutral Density (ND) filter decreases light levels by 3 stops allowing creative control in bright conditions.

My biggest gripe with the G10 is it’s inability (like most smaller form-factor cameras) to capture decent quality images at low light.  The camera is useless at around ISO400.  I Would love to be able to realistically use ISO800 with this camera.  ISO 12,800 is nice and all but not if the pictures are going to be blue.  The idea of dynamically reducing the megapixel count to better render the scene is interesting.  We’ll see once the hands-on reviews start coming in how this all works in practice.

I doubt that I’ll upgrade to this camera – it will be difficult to justify the cost of the upgrade just for improved low-light imagery – but I’ll be keeping my eyes on the reviews for sure.

Regardless of whether I get this camera, it shows that the camera makers are headed in the right direction (no more are we fighting the megapixel wars!) and this should signal similar changes throughout multiple camera lines.

Read More at DPReview

What kind of camera should I get?

I get asked this question quite a bit.  I like photography and I’m a bit of a gear head, so I understand why.  I definitely prefer it to other questions that I’ve complained about in the past.

When I think about cameras, and what’s the ‘right’ camera, this is the way I look at it.  Ultimately, it comes down to who is going to be using the camera and what they’re going to use it for.

For most users, the best camera is a small point-and-shoot style camera and I happen to be a fan of the Canon PowerShot line.  A quick look on B&H Photo shows this model, a Canon SD1200 – a 10 megapixel camera with image stabilization, a nice zoom range, of course it shoots videos and all of the other whiz-bang features you’d expect – and it all fits easily in a pocket (we’re talking shirt pocket here) all for less than $230.  This is a camera that most people will be able to carry with them everywhere (which is the most important thing you need in ANY camera) and it will take really great shots.

A few years ago I stopped carrying my compact point-and-shoot camera for a slightly larger ‘rangefinder’ size point-and-shoot, also from Canon – the Canon G10.  This allows me a lot more control over the image capture process for only a slightly larger frame.  This one doesn’t do shirt pockets (or even pants pockets really) but it will do a jacket pocket or cargo-pants pocket just fine.

Slightly larger, is a class of camera that I really like for people who want a ‘better camera’ (read: they think they want an SLR) but are really just looking for (without knowing it) a larger image sensor and larger lens.  They don’t want any of the manual controls or exchangeable lenses of an SLR.  A great camera in this class is (staying with the Canon name, for no particular reason) the Canon SX 10 IS.  For our trip to Africa, I bought Meghan a camera from this class (a Panasonic) and she took some great photos – which she wouldn’t have gotten with an awkward SLR, or with her point-and-shoot.

Finally, there’s the 4th class of camera, the SLR.  This is what most people think of when they want a ‘good camera’ but I really don’t think it’s a great match for most users.  It’s the SUV of the camera world – the big honker that everyone thinks they want but nobody uses it for what it was designed.  If you’re just going to get a single cheap lens and use that all the time, you’re just as well off getting a nice camera like the Canon SX 10 IS or equivalent.

Now, I realize that there are more than just these 4 categories (there are ultra-compacts and mini-SLRs (a form-factor I’m intrigued by)  but for the most part those are fringes that won’t suit most people.

Finally, for anyone looking for a camera, two sites that I think do a nice job of providing reviews:  Imaging Resource and DP (Digital Photography) Review.  Imaging Resource has, for a long time, offered Dave’s Picks which just makes simple, straight-forward recommendations based on different categories (by camera type, by user type, etc.,).  Looking now, I see they also have a fancy My Product Advisor application that I can’t vouch for.

DP Review offers really thorough reviews of cameras and their features and limitations.  It’s probably way more info than most people need though – so I would recommend just navigating to the ‘conclusion’ page where they write up a nice summary of their findings.

What kind of camera do you have?

“That’s a cool photo.  What kind of camera do you have?”

This question drives me nuts.  Mind you, I like that someone’s admired a photo I’ve taken.  I don’t want to seem ungrateful.  But then again, what exactly should I be grateful for – Someone who’s implied that the photo was the result of a camera and not the person wielding it?

I am perfectly willing to admit that the cameras I’ve used over the years have each improved the technical capabilities of capturing an image; and that a significant part of any image I’ve captured has been due to the abilities of the camera at the time.

But I still like to humor myself with the idea that I’ve got something to do with the process.  And so that even if one did have the same camera as I, they still might not walk away with the same shot.

Maybe I’m just too sensitive.